หัวข้อ : How to register for a KIIP class with proper time and location on socinet.go.kr (from 2021)
ลิงค์ : How to register for a KIIP class with proper time and location on socinet.go.kr (from 2021)
How to register for a KIIP class with proper time and location on socinet.go.kr (from 2021)
In order to apply for a KIIP class, you have to meet one of the following conditions:
- 1st: take a level test (사전평가) and get your assigned level based on your test score
- 2nd: submit your valid TOPIK test score online or by visiting your local immigration office and get your assigned level
- 3nd: apply for the KIIP program and start from level 0 (without taking the level test)
KIIP class policy:
There are 3 semesters each year. New KIIP Level 0 to 5 classes are about to open at the starting of each semester. You should check available classes 1-2 weeks in advance before the semester starts. KIIP Level 0 and 5 classes can also be found in the middle of the semester because of the short class hours.
KIIP 1st semester: 04 Jan - 02 May || 2nd semester: 03 May - 15 Aug || 3rd semester: 16 Aug - 12 Dec.
- Class registration time is changed from 0:00 AM to 9:00 AM.
- Due to the COVID19 pandemic, all KIIP classes are conducted online, so there is no restriction on the class location that you intend to apply for.
Good point: This means you don't have to wait until midnight to register for class anymore.
Bad point: It is more difficult to register for class since more people want to apply for the same class.
Here are a step-by-step guide for applying a KIIP class:
Step 1: Visit www.socinet.go.kr, click 회원로그인 button, then enter your ID and password. After signed in, click 마이페이지 button at the top right corner of the page.
Based on your assigned level, a list of corresponding classes will appear to register.
E.g. Your assigned level is 3, only level 3 classes will appear in the list.
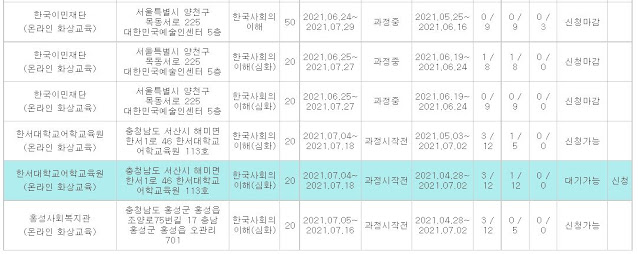
Step 3: In the 과정신청 page, scroll down to see the class list. Since all KIIP classes are conducted online, you can apply for any class, regardless of its location.
The list of classes will be updated frequently, make sure to check it often.
You should focus on the marked column as below:
- 운영기관명 = name of the institution conducting the class
- 주소 = class location (check the location on google map whether it is close or convenient to you)
- 과정및단계 = class level (in level 5, you will see both 50h and 20h classes)
- 신청시간 = registration time (the registration opening time starts at 9:00 AM, so make sure to login your account before that 5 or 10 minutes)
- 정원 (동포 / 그외) = maximum number of (overseas Korean Visas / other Visas) students in the class (e.g. 3/12 students)
- 신청 (동포 / 그외) = number of applied students (e.g. 1/11 students out of 3/12 students)
- 대기 (동포 / 그외) = number of students in waiting list (0/3 waiting students)
Step 4: After locating a suitable class, click on the name of the institution conducting the class.
You should see the following items:
- 과정시간 (red) = the time period of the class (e.g. 2021.07.04 ~ 2021.07.18 = 0.5 months)
- 요일 = day of the week that the class opens (월 = Monday, 화 = Tuesday, 수 = Wednesday, 목 = Thursday, 금 = Friday, 토 = Saturday, 일 = Sunday)
- 과정시간 (blue) = class time
- 인정시간 = number of hours per class
After checking all the above information, click 신청 at the bottom right corner and confirm again to register.
Step 5: Click the 목록조회 button, next to the 신청 button. If the applied class in the list becomes blue, you have successfully registered for a KIIP class.
Also, before the starting day of your class 1 or 2 days, your class teacher will contact you in advance via text message or kakaotalk.
For more detailed guide to a KIIP online class, please refer to this post:
นั่นคือบทความ How to register for a KIIP class with proper time and location on socinet.go.kr (from 2021)
นั่นคือบทความทั้งหมด How to register for a KIIP class with proper time and location on socinet.go.kr (from 2021) ครั้งนี้หวังว่าจะเป็นประโยชน์กับทุกท่าน เจอกันใหม่บทความหน้า.
คุณกำลังอ่านบทความ How to register for a KIIP class with proper time and location on socinet.go.kr (from 2021) พร้อมที่อยู่ลิงค์ https://yonseikorean.blogspot.com/2021/07/how-to-register-for-kiip-class-with.html


Posting Komentar
Posting Komentar